Tuesday 16 October 2012

Cute Panda Cupcakes with mini Oreo ears!

My sister-in-law loves Pandas! SO... what is the theme of ALL her Birthday presents and cakes?! These are very easy to make and look SO cute!

1 batch of your favourite cupcakes (I used chocolate)
1 batch of cream cheese icing
Mini oreos, for the ears
 "galaxy counters" or similar, for the eyes
writing icing for the eyes, nose and mouth!


Over the Rainbow Cupcakes

1 batch of Vanilla Cupcakes (or whichever type you want!)
1 batch of Vanilla Butter Icing, tinted pale blue
White icing in a piping bag with a plain nozzle / no nozzle
Rainbow belt sweets

Ice the cakes smoothly with the blue icing. I use a small angled spatula, or a butter spreader.
This is the sky. 


Then pipe on two little white clouds on each cake. Cut the rainbow belts down, and press one end into each cloud, to make the Rainbow.

Done!


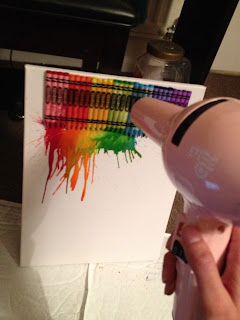
Crayola Crayon Melted on Canvas! Super quick art!


This is a really quick and fun way to create pictures for a child (or not child!!)'s room!

Step 1: Crayons!
 Step 2: Glue on Canvas

 Step 3: Heat with Hairdryer (this takes a good few minutes - I would recommend laying some newspaper down and around, as it does splash!) the crayons melt and drip down the canvas. Keep going until you are happy with the result. I worked on each set of colours at a time, then went back over them again.
 That's it! Everyone that sees this comments on it! It's a great conversation starter!!

CRAFTS: Cushions from Tea Towels

So, a non-baking post! My other passion is CRAFTS!

My wonderful sister-in-law (she was MY friend first!) taught me how to do this (she is MUCH better at making than me!)...

Take a pretty tea towel - it is best if it has an all-over pattern, or a nice singular pattern that doesn't reach too high up the tea towel. Measure a square, starting at the bottom, and fold the top flap down, RIGHT sides together, leaving a square, with a flap covering the pattern slightly. Cut a plain piece of cotton to about the same width as the square (a bit bigger), but not as tall. Pin this, right sides together, then sew down from the top right hand corner down, across the bottom and up the other side. Don't sew the top!! Then turn it inside-out and VOILA - a very quick and lovely cushion cover!

Here are a few I have made...


TOP TIPS: Freezing Icing


One of my best tips is this... make and freeze icing. It freezes really well, just leave it out a few hours before you need it, and it'll be perfect when you need to use it. My freezer is full of tubs of different icing. I would recommend labelling them - I have some lemon icing, and some "Simpsons" coloured yellow cream cheese icing which look exactly the same! This makes baking a less daunting task, as you can cover your cupcakes in more than one flavour / colour of icing! I also stock up on unsalted butter and Philadelphia when I'm shopping, so that if I have a spare bit of time I can make a few batches to get in the freezer! If you don't have tubs just use sandwich bags, they are perfect!


Amazing Carousel Banana Chocolate Chunk Birthday Cake


Girly Carousel Cake – a definite Show Stopper!


My oldest friend made a Carousel cake for her little girl (my gorgeous goddaughter) for her birthday last year, and I was jealous. Why had I not thought of that?! It looked brilliant. Now, my boyfriend and my other best friend were in the musical Carousel, so how could I not?! The finished result has to be my proudest bake to date. It took ALL day, but seeing my Sister’s face when I bought it in was priceless!

I asked Sophie in advance what her favourite type of cake was, and she said Banana… I have only ever made banana loaf before, so decided to adapt my favourite recipe, to make a cake, and also chuck in a layer of chocolate cake too, to add to the height and taste.

Chocolate Chunk Banana Cake:

540g soft brown sugar
4 eggs
4 mashed bananas
560g plain flour
2tsp baking powder
2tsp bicarb of soda
280g melted unsalted butter
2 packets Chocolate chunks (or as many as you like!)

Oven: 170 / 325 / 3

Mix sugar, eggs and then add and mix bananas (scrape scrape scrape as you go). Add the flour, baking powder and bicarb, and beat well.  Pour in the melted butter and beat again. Finally add the chocolate, and beat a few times until they are mixed in. Pour into two prepared cake tins. Bake for an hour. Don’t keep opening the oven, but keep an eye on the cakes. They should be firm to touch, not wobbly, and a fork should come out clean. Remove and cool. Also make one cake as per “Go To Chocolate Cake” instructions.

Using my trusty Cake Leveler I chop off the tops, so that all three are perfectly flat, and the same height. This gives you some bits to eat with a nice cup of tea!

Cover one banana cake with icing, and place the chocolate cake carefully on top, cover that with icing, and lay the other banana cake on top, carefully aligning the sides. 
Now we are ready to crumb coat and then cover in white cream cheese icing. Now come the fun bits! I was making this up as I went along, so first I arranged mini marshmallows around the bottom of the cake (luckily they fit perfectly!) I had bought chocolate fingers. I decided they looked too boring and plain, so I dipped each one in a bit of icing, and then in sprinkles, and then arranged those above every other marshmallow (as I knew there was an even number)… I did run out 6 before the end, and it was a Sunday, but luckily the local petrol station had them….. lesson learnt, prepare properly beforehand!!). 
I then put more mini marshmallows around the top of the fingers, for symmetry. 
Now onto the Ice Cream Cones… given the sheer size of the triple layer cake, one cone was not enough, and I had stupidly bought the fancy waffle ones, which are not flat on the bottom! I tried to cut the top off and it snapped, so my clever boyfriend suggested dampening the very ends a bit… it worked like a charm! So with my flat bottomed cone, I dunked the point in icing, and stacked another one on top… I used 5, by which time I was happy with the height. Then I covered in icing, and rolled in sprinkles, adding more sprinkle covered chocolate fingers to the bottom (well, as I’d bought a whole new box…..!). That went in the middle of the cake.

Now for the paper plate… I had some pretty pink ones from my birthday last year, so I cut and folded it into a slight cone, and bakanced it on top… it didn’t stay, and it didn’t look pretty enough, so covered the underside with tin foil, and then dabbed lines of icing all around the bottom, and running from the point to the edges, then sprinkled sprinkles on so they stuck. Much better. What can I hold it on with? Ooooooh I have little flags on cocktail sticks… perfect! Finally I taped coloured paper straws onto the underside of the plate. I made a tiny hole in the plate, and chopped the very point off the icecream cone, and added a bit of icing to hold it, then stuck them on, pushing the point of the stick in the point of the cone, through the plate… after chopping the straws to the right length (slightly longer than you think, so you can push them slightly into the icing and cake, to hold them in place. 

FINALLY (yes, really this time!) I added the Carousel Horse candles (by Rice). 


Colourful Rainbow and Bunting Birthday Cake


This was for my Mum’s Birthday in April. I had fancied trying out piping striped icing for a while, and had recently discovered the joys of Paint Chips, so this felt like the perfect chance to combine the two… I have also always been a fan of Rainbows!


After preparing my usual Go To Chocolate Cake (see recipe and method in another post), in just a single layer, and leaving it to cool completely, I do a crumb coat, then after that is set, a thin plain white coat. This will be the base to be piped on, so try and make sure it's smooth and even, especially on the sides.
 Meanwhile I prepare the icing. So, 7 bowls, a couple of drops of food colouring in each one… 


Then in to each one go cream cheese icing, and each is blended, until I have the colours I want. 


Now we prepare the piping bag…. Here comes the fun part! 

So, I have a silicone piping bag (from Lakeland – I want to live there!) and a star nozzle, and now I spoon the icing in, starting with red, then orange etc (Red, Orange, Yellow, Green, Blue, Purple… remember the rhymes you learnt at school!), adding each colour on top in the middle of the bag. Be careful not to fill the bag too full, or you will NEVER be able to squeeze it, and will end up with icing everywhere. Believe me. 

Squeeze a little bit onto a plate to check, and then, starting at the outside, pipe in decreasing circles, ending up in the centre with purple (hopefully!).

To finish off, I made some mini bunting flags with Paint Chip Cards, cut into triangles, then sewn onto a bit of cotton, and strung that across two bamboo skewers. 


For fun, I also wrote “Mummy” on the flags! 


It looks so pretty when cut, as you get a proper rainbow! This definitely had the WOW factor.